Rename e-invoices automatically and file them in a structured way
Incoming invoice files often carry cryptic names such as 2026-06_4711_scan.pdf or invoice_final_v2.xml. This how-to shows how Automatic X-Invoice Processor automatically names every e-invoice after its actual invoice data - e.g. 2026-06-15 Sample Office Supplies Ltd INV-2026-1001.pdf - and files it into an organized archive structure, such as one subfolder per year or supplier.
At a Glance
- Difficulty: Beginner
- Time required: about 5 - 10 minutes
- Prerequisites: Automatic X-Invoice Processor installed; a folder where e-invoices arrive
- Tasks used: Rename file or Move file
Video tutorial: Automatically rename invoices (with narration and optional subtitles)
Rename or move - which one fits?
| Task |
Use case |
| Rename file |
The file stays in the source folder (or moves to the target if a directory is specified) and gets a new name |
| Move file |
The file is moved to the target - the inbox folder stays empty; optionally with a new name as well |
For an invoice archive, Move file is usually the right choice; plain Rename file is suitable when a follow-up system expects the files in the same folder.
Step 1: Create a profile
- Click New profile… in the profile toolbar and enter a name (e.g. “Archive incoming invoices”).
- Under Mode, choose the file type: Process PDF file (ZUGFeRD) or Process XML file (XRechnung).
- Under Monitored folders, add the inbox folder.
- Under Example invoices, add a typical invoice - you will use it in a moment to verify the naming scheme.
The basic setup is described in detail in the how-to “Getting started”.
Step 2: Add the task and define the naming scheme
Click Add in the task list and choose Move file (or Rename file).
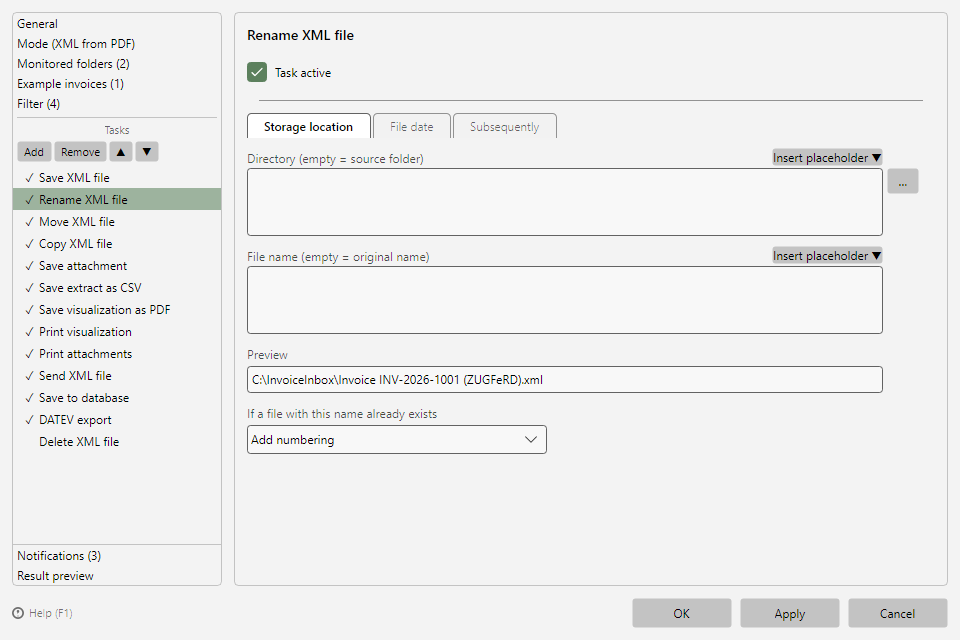 Rename file task with the Storage location tab and preview
On the Storage location tab:
- Directory: Enter the archive folder - preferably with placeholders for an automatic folder structure, e.g.
D:\Archive\Invoices\<InvoiceYear> (one subfolder per year) or D:\Archive\Invoices\<SellerName> (per supplier).
- File name: Define the naming scheme from placeholders, e.g.
<InvoiceDateComplete> <SellerName> <InvoiceId>. The Insert placeholder button opens the menu of all available values, grouped by topic (see chapter 70.1).
- The preview immediately shows the resolved result name based on the selected example invoice.
- Choose the conflict behavior if a file with this name already exists - the default is Add numbering, so no invoice gets overwritten.
Useful placeholders for naming schemes:
| Placeholder |
Value |
<InvoiceId> |
Invoice number |
<InvoiceDateComplete> / <InvoiceYear> / <InvoiceMonth> / <InvoiceDay> |
Invoice date, complete or as components |
<SellerName> |
Seller/supplier name |
<GrandTotalAmount> |
Total amount |
<BuyerReference> |
Buyer reference / Leitweg ID |
Invalid file name characters in placeholder values are removed automatically.
Step 3 (optional): Set the file date
On the File date tab you set the timestamps of the filed file - e.g. Set modification date to: Invoice date. This way, Windows Explorer sorts the archive chronologically by invoice date instead of by processing time (see chapter 9.4).