Step-by-step instructions for CSV mapping with Automatic Email Processor
This how-to shows how to create a lookup table that maps sender domains to client or supplier names, and how to reference the table as a placeholder in the Save attachments task. The result: incoming invoices automatically land in the right client folder without having to create a separate profile for every supplier.
At a Glance
- Difficulty: Intermediate
- Time required: about 15 minutes
- Prerequisites: A profile with the Save attachments task (see Save attachments automatically)
- Example: Distribute incoming invoices from 50 suppliers across 50 client folders
Step 1: Open the program options
Open the program options from the main menu File → Program options… and select the Lookup tables category.
Click Add… to create a new lookup table.
Tip: The same Excel or CSV file can also be used in a filter list - this way you pre-filter incoming mail from known senders (for example as a precondition for the task) and then use the lookup table to derive the value for the path. The file is maintained in one central place; both consumers stay in sync automatically.
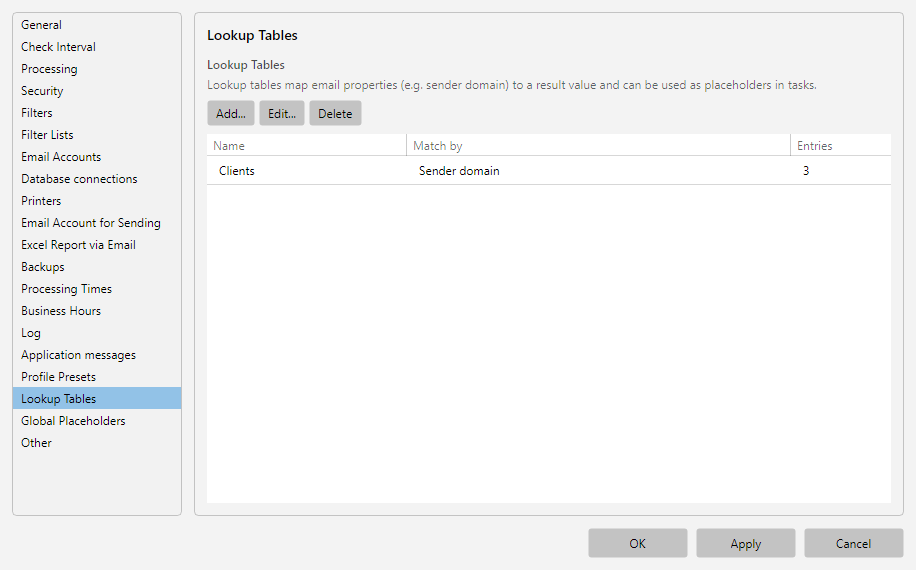 Lookup tables list in program options
Step 2: Name the table and define the match columns
In the editor, first give the table a name and decide which email property is used as the lookup key.
- Enter a descriptive identifier under Name, e.g.
Clients. This name appears later in the placeholder.
- Under Match columns, configure which email property serves as the key. For client routing the typical choice is Sender domain (alternatively e.g. Sender address or Subject contains).
- Under Result column, define which column delivers the value when there is a hit - for example
Client name.
Tip: Multiple match columns are allowed - the lookup then requires all values to match. This lets you combine “sender domain and subject contains”, for instance.
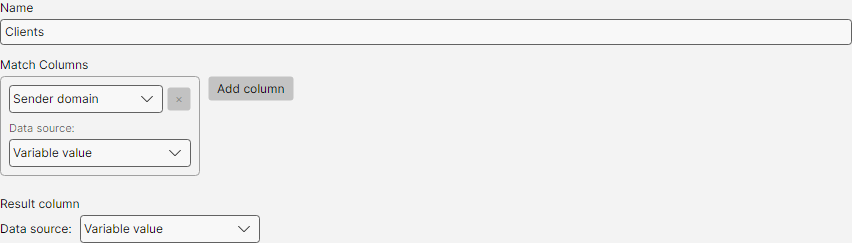 Name, match columns and result column
Step 3: Add the mapping rows
The actual mappings can be added in two ways - either typed directly into the editor or imported from an external Excel/CSV file. Both variants can also be combined (e.g. import the initial dataset, then add a few more rows by hand).
Variant 1: Type the rows in the editor
In the Data section of the General tab, type the mappings directly into the data grid - one row per client.
| Sender domain |
Client name |
| mueller-gmbh.de |
Mueller Ltd |
| schulze-kg.de |
Schulze KG |
| meier-ag.de |
Meier AG |
Use the buttons above the grid to add more rows:
- Insert row above / Insert row below - new empty row relative to the selected row.
- Insert rows from clipboard - paste multiple rows at once (e.g. copied directly from Excel).
- Duplicate row / Remove rows - copy or remove existing entries.
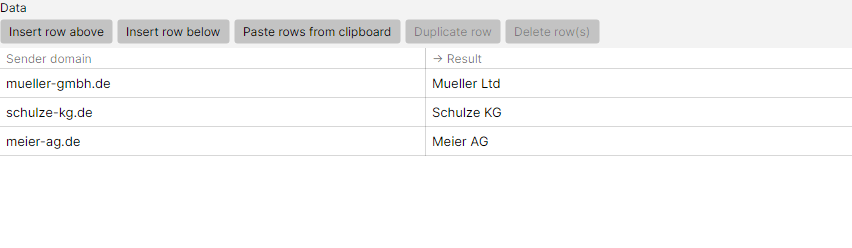 Data entry directly in the editor
Variant 2: Use an Excel file
If the mappings already exist in an Excel or CSV file, the file itself can be the central source of truth - to change a mapping you simply edit the file. Switch to the Values from file tab.
- Use the … button to select the file path to the XLSX, XLS or CSV file.
- For CSV files: set Encoding (e.g. UTF-8) and Column separator (e.g.
;) to match the file. Both fields are ignored for Excel files.
- Tick First row contains column headers if the file has a header row - it is then skipped instead of being treated as data.
- Click Import. The rows are loaded into the data grid on the General tab and can be edited further from there.
Tip: The same source file can be evaluated differently in several tables - match columns and the result column are configured per table.
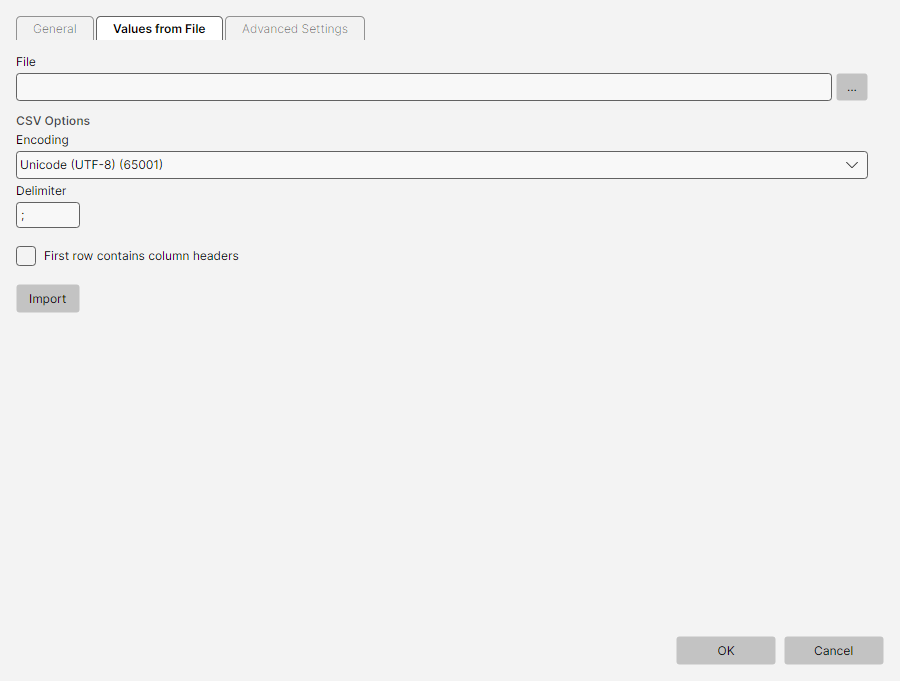 Import values from file
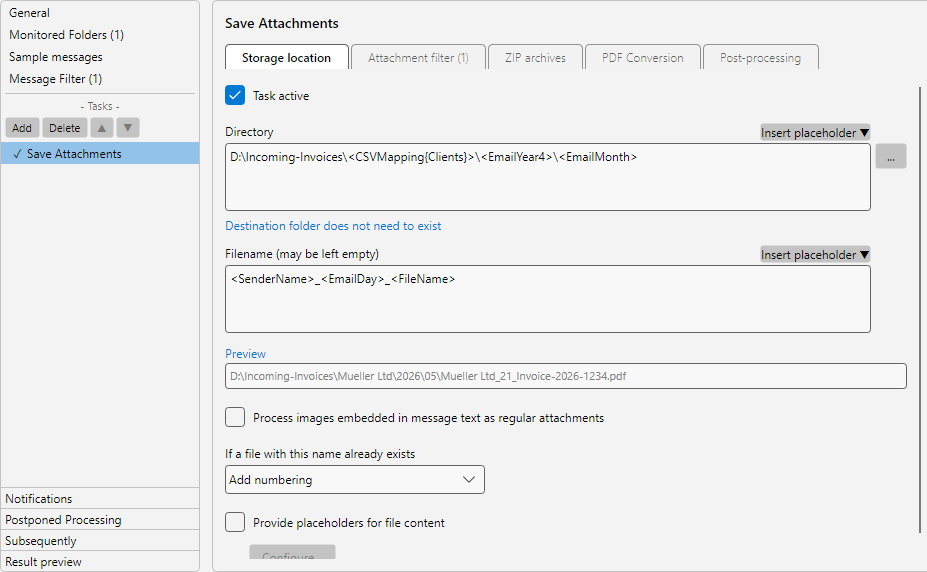
Step 4: Use the table in the “Save attachments” task
Close the program options with OK and open the profile in which attachments should be filed.
- Switch to the Save attachments task and then to the Storage location tab.
- Click into the Folder field.
- Click Insert placeholder to open the placeholder menu. Under Mappings you find one entry per defined lookup table.
- Select Clients -
<CSVMapping{Clients}> is inserted into the folder input field.
- Extend the path with the desired structure, e.g.:
D:\Incoming-Invoices\<CSVMapping{Clients}>\<EmailYear4>\<EmailMonth>
In the Preview field you see, for the currently selected sample message, what the path will look like at runtime - for example D:\Incoming-Invoices\Mueller Ltd\2026\05.
Tip: For the storage-location preview to show a meaningful path, the sample message selected on the Sample messages tab must have a sender whose domain (or another match value configured in the table) is in the table. Otherwise the placeholder is replaced by (no match) or the configured replacement value, and the preview reflects that. If needed, drop a matching sample message into the sample-messages tab from the log or via drag-and-drop.
 Placeholder in the folder input field
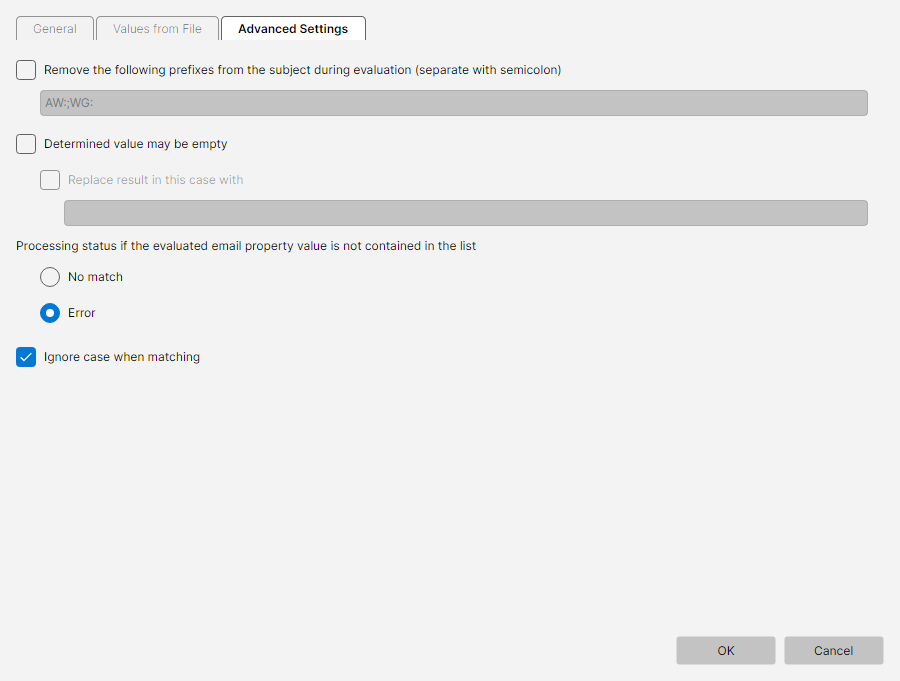
Step 5: Handle the “no match” case
What happens when mail arrives from an unknown sender? Configure this behavior in the table editor on the Advanced settings tab.
- Enable Determined value may be empty and enter a default under Replace result with (e.g.
Unknown). Mails from unknown senders then land in D:\Incoming-Invoices\Unknown\… and can be sorted manually.
- Set Processing status if no match to Error so that a no-match run is marked as an error. Unknown senders then become visible in the log instead of being filed incorrectly.
- Additionally, Ignore case when comparing filter values can be enabled if domains arrive in different casing (e.g.
Mueller-GmbH.de vs. mueller-gmbh.de).
 No-match handling and advanced options
Step 6: Save and test the profile
- Close the Profile settings window with OK.
- Click Check now in the bottom status bar to trigger the next run manually.
- Send yourself a test email from one of the configured sender domains (or use Catch up… in the profile toolbar to run the profile against existing mailbox content).
- Verify in the destination folder that attachments arrived in the correct client folder.
The log list shows the resolved path per message. Double-click an entry to open the processing detail - you can see exactly which value the lookup table returned.